
MR9272E instructions
MR9272E is mainly used for commissioning of PLC, electric valve, pneumatic valve, two-wire transmitter, etc. the equipment is simple to use and easy to use.
Model selection table
Model |
MR9270S+ HART(D) |
MR9270S+(D) | MR9270CP (D) |
MR9272E |
|---|---|---|---|---|
Smart Hart version |
Intelligent enhancement |
Professional enhancement |
Basic type |
|
Signal type |
||||
Current (input / output) |
 |
|
|
|
Voltage output |
|
|
|
|
Passive signal (transmitter analog) |
|
|
|
|
Frequency /pwm (input / output) |
|
|
|
|
MV / thermocouple (input / output) |
|
|
|
|
Resistance / thermal resistance (input / output) |
|
|
|
|
24V (transmitter power supply) |
|
|
|
|
Program extension function |
||||
Programming output (mr9272e is automatic output) |
|
|
|
|
Signal preset output |
|
|
|
|
Output input |
|
|
|
|
RS485通讯接口 |
|
|
||
USB mapping to MODBUS slave |
|
|
|
|
Firmware upgradeable |
|
|
|
|
Real time curve |
|
|
|
|
Simplified Chinese / traditional Chinese / English |
|
|
|
|
Mr9270s exclusive function |
||||
Online record of upper computer connection |
|
|
||
Quantitative output of pulse signal |
|
|
||
Pulse accumulation |
|
|
||
Modbus master station |
|
|
||
USB to RS485 serial port |
|
|
||
20000 record points simple paperless record |
|
|
||
Multi segment PID control panel |
|
|
||
Hart communicator (built-in Hart modem) |
|
|||
Catalogue
1. Product specification and signal introduction
2. Product structure
3. Description of work interface
4. Operating instructions
5. Setting
6. Description of automatic output parameters
7. Valve commissioning
8. Battery
Product specification and signal description
| Product specifications | |
|---|---|
Size |
91*71*30mm |
Weight |
173g |
Power supply mode |
3.6V lithium battery 2500ma or 3 AA batteries 1.5v*3 |
Charging (typec charging interface) |
5V/1A |
Language |
Simplified Chinese /english |
| Signal function table | |||
|---|---|---|---|
Signal type |
Range |
Resolution |
Accuracy |
Current measurement (ma/in port) |
0-24mA |
0.01%mA |
0.10% |
Power distribution measurement (ma/in port and v/in port) |
0-24mA |
0.01%mA |
0.10% |
Voltage measurement (vin/ port) |
0-20V |
0.01%V |
0.10% |
Current output |
0-24mA |
0.01%mA |
0.10% |
Passive current output |
0-24mA |
0.01%mA |
0.10% |
Voltage output |
0-20V |
0.01%V |
0.10% |
-1-
Click to return to the directory)
Product mix |
|
|---|---|
 |
|
1 |
Signal common negative port |
2 |
Current / voltage output port |
3 |
Current measurement |
4 |
Voltage measurement /24v power supply |
5 |
"AUTO Key": press the automatic lifting output once, and then press it once to stop (enter the menu to set the mode of automatic output) |
6 |
"In key", press the "IN key" to cycle and switch the signal type in turn: current measurement / voltage measurement / distribution measurement |
7 |
Current or passive output: Press’ +25% key ‘to increase the output by 4mA Voltage output: Press’ +25% key’to increase the output by 2.5V |
8 |
"OUT key" press the output key to cycle the signal type in turn: current output / passive output / voltage output |
9 |
"MENU key": press "menu key" to enter the setting |
10 |
Current or passive output: Press the ‘-25% key’ to reduce the output by 4mA Voltage output: Press the ‘-25% key’ to reduce the output by 2.5V |
11 |
Current or passive output: Press the ‘0% key’ to output 4mA Voltage output: Press’ 0% key ‘to output 0V |
12 |
Current or passive output: Press the ‘100% key’ to output 20mA Voltage output: Press the ‘100% key’ to output 10V |
-2-
Click to return to the directory)
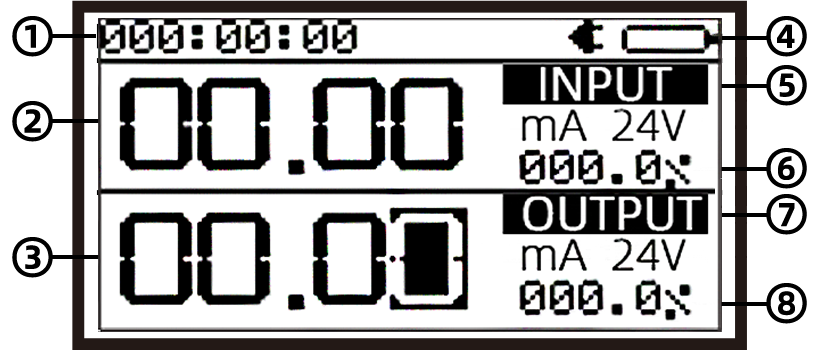
Description of work interface |
|
|---|---|
 |
|
1 |
Startup time |
2 |
Measured value |
3 |
Output set value |
4 |
Battery capacity |
5 |
Measurement type |
6 |
Measurement percentage |
7 |
Type of output |
8 |
Output percentage |
Wiring diagram |
|
(2) : voltage measurement (3) : power distribution measurement (two-wire transmitter, pneumatic positioner feedback) (4) : current / passive / voltage signal output |
|
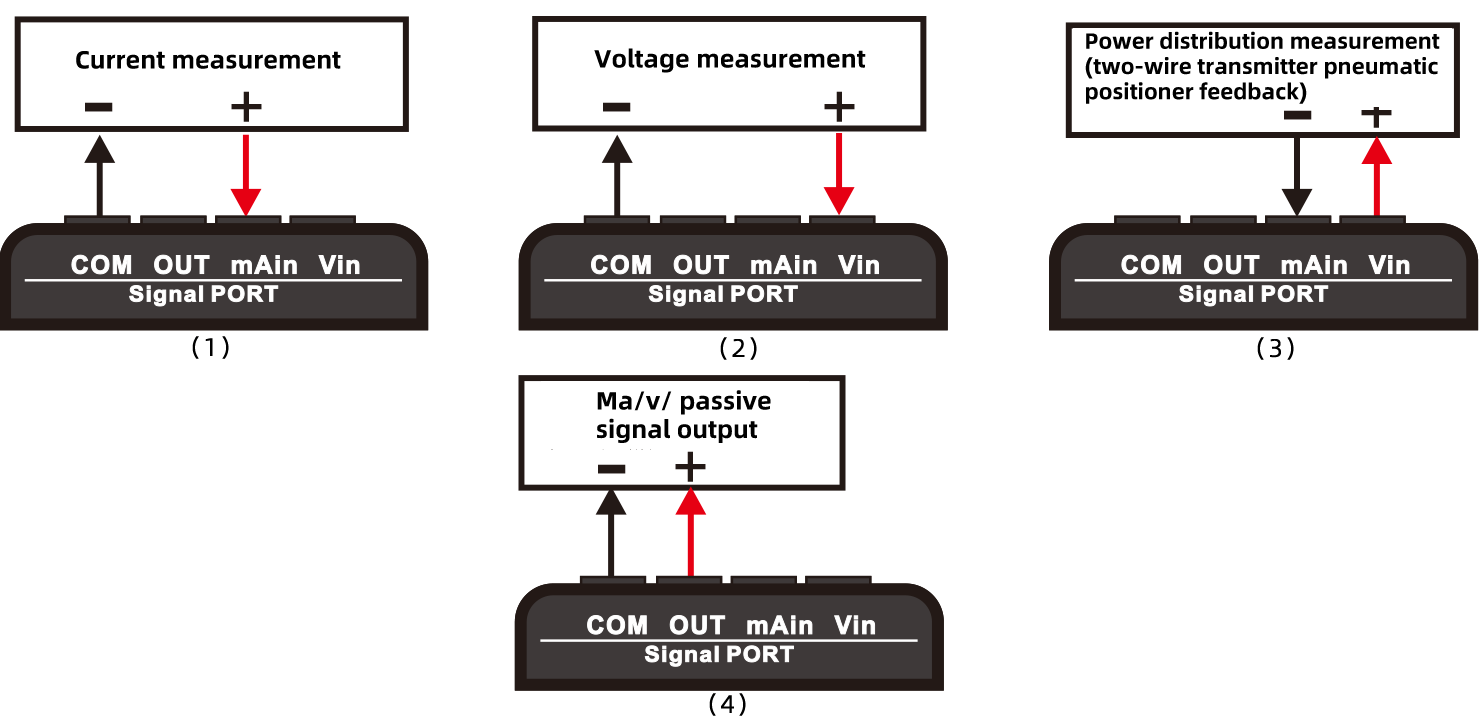 (1) : current measurement
-3-
Click to return to the directory)
Operating instructions |
|
|---|---|
Switch on / off |
Press and hold the button at the bottom of the instrument for two seconds to turn it on. If you need to turn it off, press the button at the bottom of the instrument for two seconds to turn it off |
OUT key |
Press the output key to cycle the signal type in turn:Current output / passive output / voltage output |
IN key |
Press "IN key" to cycle and switch the signal type in turn: current measurement / voltage measurement / distribution measurement |
Signal operation |
The direction keys "↑", "↓", "←" and "→" are used to set the output signal value |
Signal lock key |
Long press the "MENU" key, and the lock icon will appear in the status bar (refer to the following figure for details). Long press the "menu" key to unlock |
 |
|
-4-
Click to return to the directory)
SETUPPress "MENU" to enter the setting |
|
|---|---|
AUTO Step Menu |
(please refer to page 6 for the specific description of automatic output) Press the "IN" key to enter the setting menu: 1. Automatic mode, quickly switch the mode through the ‘←’ and ‘→’ keys 2. 2. Maximum value: press the "IN key" to enter the editing mode, and confirm that the editor presses the "IN key" once 3. Minimum value: "IN key" enter the editing mode, and confirm the editing by pressing "IN key" once 4. Delay: press "IN key"; enter the editing mode, and confirm that the editing is pressing "IN key" once 5. Step value: Press IN key "to enter the editing mode, and confirm the editing by pressing IN key once" |
Keep |
Press "IN key" to switch on/off (used to maintain the set output signal value) |
OFF Time |
It can automatically shut down when not in use. The shutdown time can be set. The setting range is 0 minutes /30 minutes /60 minutes /90 minutes /120 minutes |
Backli ght |
Move the cursor here and set the brightness through the direction keys’ ← ‘and’ → ‘ |
Language: |
Move the cursor here and set the language through the direction keys’ ← ‘and’ → ‘ |
② : return to the corresponding "AUTO Key" |
|
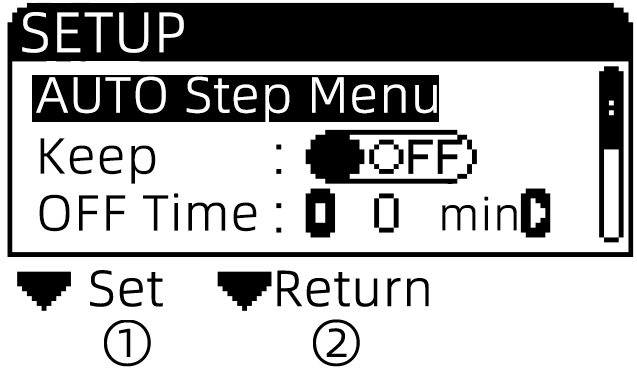 ① : set the corresponding "IN key"
-5-
(Click to return to the directory)
Automatic output parameter description |
|---|
② : measurement signal percentage ③ : automatic operation mode ④ : number of cycles of automatic operation ⑤ : output signal percentage |
Description of three modes of automatic output:
|
 ① : type of measurement signal
 It works repeatedly from the minimum signal value to the maximum value and then from the maximum value to the minimum value output
 Rise from the minimum signal value to the maximum value, and then directly change from the maximum value to the minimum value output, so work repeatedly
 After pressing the automatic output key, the signal will be output at the maximum value, and then it will be output from the maximum value to the minimum value, so it works repeatedly
-6-
(Click to return to the directory)
Valve commissioning |
|
|---|---|
② : bottom half screen |
|
Pneumatic positioner |
Commissioning pneumatic valve positioner:
1. Press the "IN" key to switch the upper screen measurement to distribution measurement 2. Press "OUT" to switch the output of the lower half screen to current output 3. Refer to the wiring diagram of the left pneumatic positioner for connection 4. Modify the current value to be more than 4mA and check whether the valve works 5. If the lower half of the screen changes between current output and open circuit, the wiring may be incorrect |
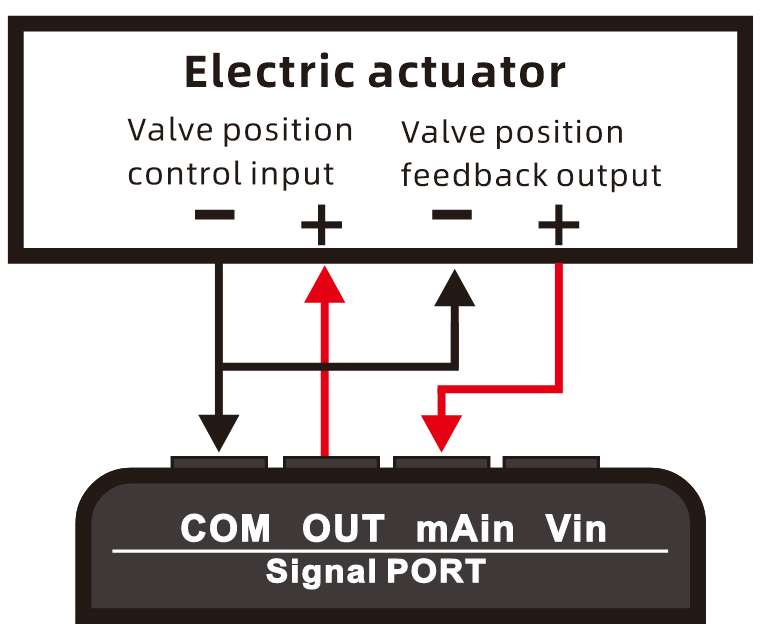 Electric actuator Electric actuator |
Commissioning electric actuator:
1. Press the "IN key" to switch the upper screen measurement to current measurement 2. Press "OUT key" to switch the output of the lower half screen to current output 3. Refer to the wiring diagram of the left pneumatic positioner for connection. Note that only three wires are required 4. Modify the current value to be more than 4mA and check whether the valve works 5. If the lower half of the screen changes between current output and open circuit, the wiring may be incorrect |
 ① : top half screen
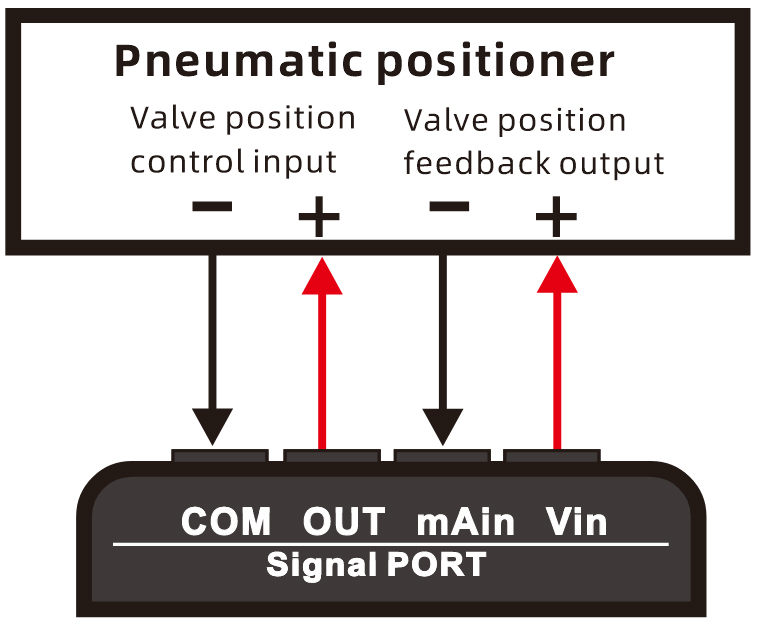
-7-
(Click to return to the directory)
Battery |
|
|---|---|
This product can use two kinds of batteriesLithium battery:
A 2500ma lithium battery is built into the product. For the health of the battery, if you don’t use it for a long time, please charge it to about 80% and try not to fill it up. When the battery is at the lowest level, please charge it immediately, otherwise it will damage the battery or cause battery damage
AA No.5 battery: after removing the lithium battery, three 1.5V ordinary alkaline batteries can be installed. If the battery is exhausted, please take out the battery in time to avoid damaging the product due to liquid leakage |
-8-
(Click to return to the directory)